
How to Make IP Camera Recordings with Your Synology NAS?
Using Synology Surveillance Station, you can connect IP cameras to your Synology NAS to capture and store footage. This setup not only provides more storage capacity than a camera’s SD card but also allows you to view live footage through a user-friendly interface. This guide walks you through the steps to connect an IP camera to your Synology NAS.
Installing an IP Camera for Synology in 5 Steps
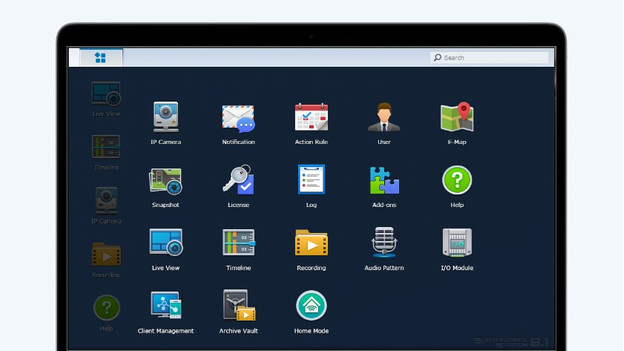
Follow these steps to set up your IP camera with Synology Surveillance Station:
- Install Synology Surveillance Station.
- Connect the camera.
- Enter the camera information.
- Review and configure settings.
- Verify the connection.
Requirements:
- A Synology NAS
- Internal hard drives for footage storage
- A compatible IP camera
- A desktop or laptop
- A (modem) router connecting the NAS, IP cameras, and computer
Step 1: Install Synology Surveillance Station

- Open the Synology Package Center and search for “Surveillance Station.”
- Click Install to download the application.
- Once installed, you’ll find Surveillance Station in the main menu.
- Open the app. If you see an empty window, don’t worry—you haven’t connected a camera yet.
Step 2: Connect the Camera to Your NAS
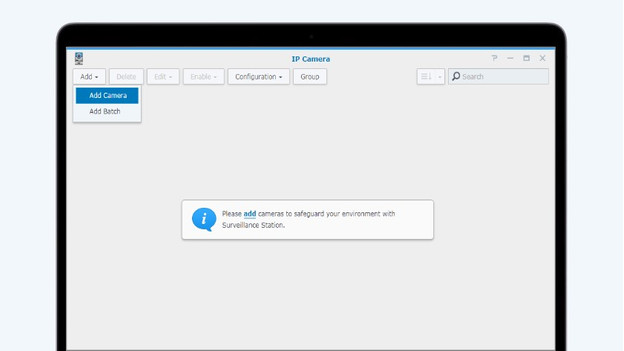
- Open Surveillance Station and navigate to IP Camera from the main menu.
- Click Add to launch the Camera Wizard.
- Choose between Quick Installation (basic setup) or Complete Installation (customize video settings, recording options, and schedules).
- Select the server you want to connect to and proceed.
Step 3: Enter the Camera Information
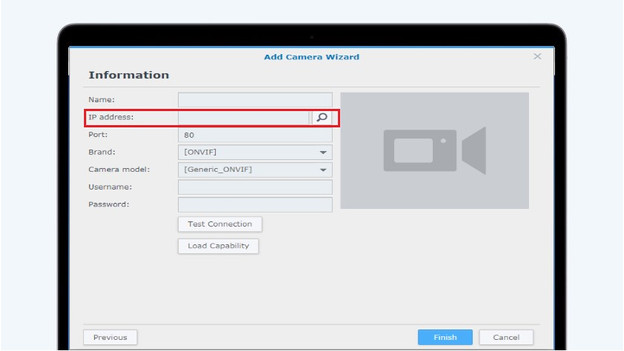
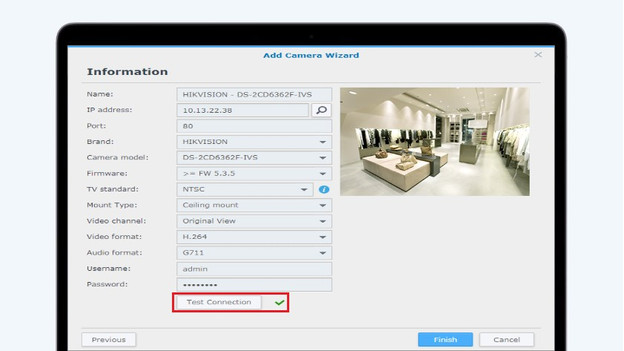
- Click the magnifying glass next to IP Address to automatically search for available devices.
- Select your camera from the list and click OK.
- Surveillance Station auto-fills basic details. Disable extra features like firmware or UPnP on the camera if needed.
- Test the connection by clicking Test Connection. If successful, a green check mark will appear, and you’ll see a live preview of the camera feed.
Step 4: Configure and Review Settings
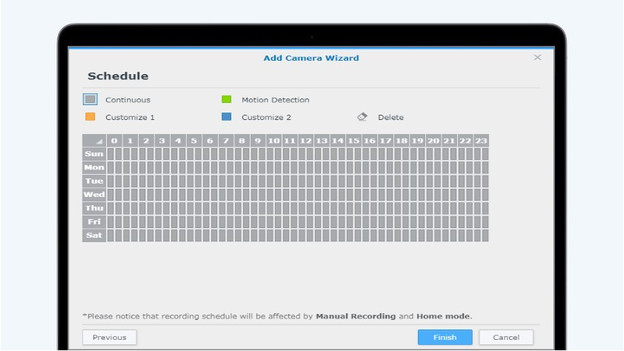
If you chose Complete Installation, you’ll encounter advanced settings:
- Video Settings: Adjust audio format, streaming profiles, resolution, and frame rate for up to three streams.
- Recording Options: Configure pre-recording times, storage duration, and select a storage drive or volume.
- Schedules: Set specific times for recording by dragging across the timeline fields.
Step 5: Verify the Connection
- Once installation is complete, your camera will appear in the device list with its connection status:
- Activate: The camera is connecting.
- Disconnected: Indicates an issue with the connection.
- To view live footage, open Surveillance Station, navigate to Recording, and select the desired video.
Troubleshooting Connection Issues
Why Won’t My Camera Connect After the Test?
- The Test Connection button checks HTTP settings only. Update your camera firmware, restart the device, or check your NAS firewall settings. Adjust firewall permissions under Control Panel > Security > Firewall.
Surveillance Station Can’t Detect Your Camera:
- Ensure your camera is listed in the Synology-supported camera list.
- Confirm the camera is connected to the same network as your NAS. The search function only works for devices on the same network.
What If the Connection Test Fails?
- Verify that the correct camera type is selected in the installation menu.
- Recheck the installation settings and retry the connection.
By following these steps and addressing common issues, you can seamlessly integrate your IP camera with your Synology NAS for secure and efficient surveillance.